


Balboa VL200 Topside Control Panel (4-Button Mini-Oval, Without Overlay) — Compatible with Balboa VS / GS Series Spa Packs
$149.00
90 in stock
Fast dispatch
Order in
--:--:--
for shipping today
✨ Balboa VL200 Topside Control Panel (4-Button Mini-Oval, Without Overlay) — Compatible with Balboa VS / GS Series Spa Packs
Genuine Balboa Water Group LCD replacement panel — precision control for effortless hot tub management.
📋 Product Overview
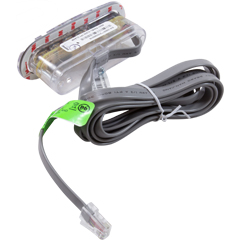
The Balboa Water Group VL200 is a compact 4-button mini-oval topside control panel with an LCD display, designed for spas running Balboa VS or GS Series spa pack control systems. With its slim 4-3/8″ × 1-5/8″ footprint, the VL200 is one of Balboa’s smallest electronic topsides — perfect for spa shells with limited deck space, and one of the most widely used OEM topsides in the industry. It works with Balboa’s M7 temperature and flow sensor technology for accurate temperature control and integrates seamlessly with VS/GS Z-suffix spa packs (VS501Z, GS501Z, VS513Z, GS513Z, and similar).
This listing is for the panel without overlay — ideal for spa technicians, OEM hot tub builders, and homeowners who plan to transfer their existing button overlay or order an overlay sticker in a layout that matches their spa’s exact configuration. Multiple overlay options are available, including layouts for single-pump, duplex (pump + blower), and heat jacket system spas.
The VL200 controls a 2-speed pump, a 1-speed blower, a light, and water temperature — making it suitable for the vast majority of mid-range hot tubs that don’t require multi-pump or color-screen functionality. This is a genuine Balboa Water Group OEM part with the standard RJ45 8-wire (8-pin phone plug / Ethernet style) connector used across the entire VS/GS series. Used as the factory-original topside on Viking spas (pre-2015), QCA Spas, and many other major hot tub brands.
⭐ Key Features
- ✅ Genuine Balboa Water Group OEM — Authentic factory part, not aftermarket
- ✅ 4-Button Electronic Control — Easy access to the most important spa functions
- ✅ LCD Display — Clear digital readout of temperature and system status
- ✅ Mini-Oval Compact Form Factor — 4-3/8″ × 1-5/8″ footprint fits small spa shell cutouts
- ✅ Compatible with Balboa VS / GS Series — Works with VS500, VS300, VS501Z, GS501Z, VS513Z, GS513Z, and other Z-series spa packs
- ✅ M7 Sensor Technology — Integrates with Balboa’s patented temperature and flow sensors for accurate readings
- ✅ Controls 2-Speed Pump + 1-Speed Blower + Light + Temperature — Standard duplex hot tub feature set
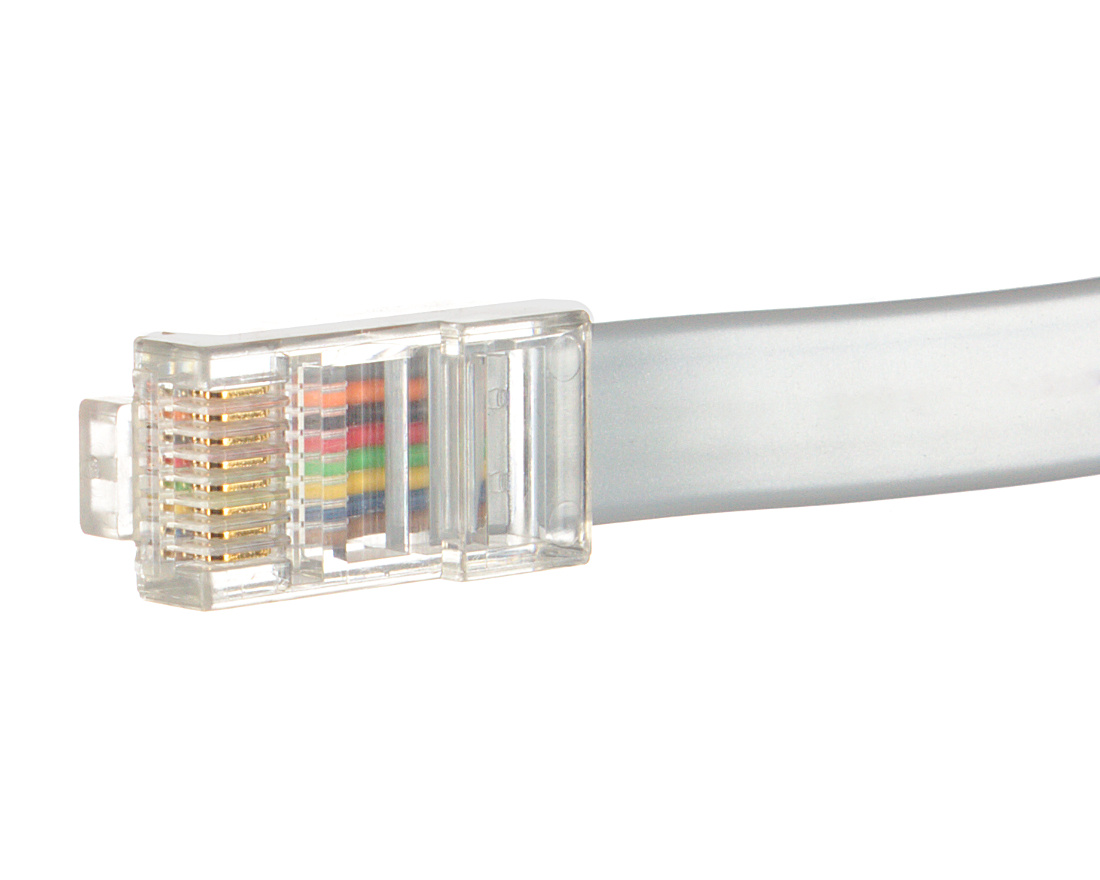
- ✅ RJ45 8-Wire Connector — Standard Balboa VS/GS series topside connection (Ethernet-style phone plug)
- ✅ 6-Foot Cable — Standard length; extension cables available for longer runs
- ✅ Without Overlay — Choice of multiple overlay layouts to match your spa’s pump and accessory configuration
- ✅ Direct Replacement for 30+ Older Balboa Part Numbers — Including 52144, 52312, 52487, 53238, 55123, 55472, X310001
- ✅ OEM Topside for Viking (pre-2015), QCA, and Other Major Spa Brands — Trusted by spa manufacturers worldwide
- ✅ Adapter Plate Available — Lite Leader adapter plate fits older or differently-shaped cutouts
- ✅ 1-Year Manufacturer Warranty — Backed by Balboa Water Group
⚙️ Technical Specifications
| Specification | Value |
|---|---|
| Manufacturer | Balboa Water Group |
| Model | VL200 |
| Manufacturer Part Number | G8220 (without overlay) |
| Topside Type | Electronic |
| Part Type | Topside Only (No Overlay Included) |
| Display Type | LCD |
| Number of Buttons | 4 |
| Functions Controlled | 2-speed pump, 1-speed blower, light, temperature |
| Cable Length | 6 ft |
| Connector Type | RJ45 8-Wire (8-Pin Phone Plug / Ethernet Style) |
| Panel Shape | Oval, Mini |
| Panel Dimensions | 4-3/8″ × 1-5/8″ |
| Compatible Spa Pack Series | Balboa VS Series, GS Series (especially Z-suffix models) |
| Sensor Technology | M7 (Balboa patented temperature and flow sensor system) |
| Voltage Compatibility | Works with both 120V and 240V VS/GS series spa packs (low-voltage signal panel) |
| Color | Clear / Black |
| Warranty | 1-Year Limited (Balboa Water Group) |
📌 Always confirm cutout size against your existing panel before ordering — small variations exist between spa shells.
🔄 Compatibility Guide
This Topside is Compatible With Balboa VS / GS Series Spa Packs:
| Spa Pack Model | Series | Confirmed |
|---|---|---|
| VS500 | Balboa VS | ✅ |
| VS501Z | Balboa VS (popular pairing) | ✅ |
| VS513Z | Balboa VS | ✅ |
| VS300 | Balboa VS | ✅ |
| GS501Z | Balboa GS (popular pairing) | ✅ |
| GS513Z | Balboa GS | ✅ |
| Other VS/GS Z-suffix packs | Balboa | ✅ |
📌 The VL200 is specifically designed for Balboa VS and GS series spa packs that have the dedicated RJ45 topside port. Z-suffix models (501Z, 513Z) are the most common pairing.
Replaces These Older Topside Part Numbers:
The VL200 (G8220) is the modern replacement for an unusually long list of older Balboa part numbers — many spa manufacturers used different SKUs of essentially the same topside over the years:
- ✅ Balboa G8220 (current manufacturer part number for VL200 without overlay)
- ✅ Balboa 52144, 52267, 52267-01, 52312, 52361, 52365, 52487, 52489, 52564, 52637
- ✅ Balboa 53238, 53280, 53636, 53676, 53813
- ✅ Balboa 54252, 55050, 55080, 55123, 55144, 55472, 55563, 55654
- ✅ Balboa 11095, 11127, 11219, 11393, 11852 (overlay references)
- ✅ Balboa 163742, 305698, 407012, 407014, 407016, X310001, 9705-50
- ✅ HydroQuip kits 34-52144-K, 34-52312-K, 34-52487-K, 34-55123-K
- ✅ Cross-references MVP240, MAS25, BB53238, _53636
- ✅ Companion overlay numbers 1320 (Jet/Light/Cool/Warm), 1318 (Jets/Jets/Temp/Light), 1268 (Heat Jacket System: Jet/Light), 1249 (Duplex: Jet/Light), 1255 (Duplex: Jet/Blower/Light)
NOT Compatible With:
- ❌ Balboa BP series spa packs (BP100, BP501, BP601, BP2000, BP2100, BP7) — those use 4-pin Molex connectors, not RJ45
- ❌ Balboa EL or GL series spa packs — those use 8-pin Molex connectors (use ML series topsides)
- ❌ Older Balboa M7 systems that pre-date the RJ45-equipped VS/GS series
- ❌ Gecko, HydroQuip (proprietary), ACC, or non-Balboa control systems
- ❌ Pneumatic / air-button (Tecmark Command Center, EasyPak) systems
How to Verify Compatibility:
📍 Check your spa pack model — look for a label inside the equipment cabinet 📍 Confirm the prefix is “VS” or “GS” (e.g., VS501Z, GS501Z, VS513Z) 📍 Check that your existing topside cable has an RJ45 8-wire connector — looks like an Ethernet/network cable plug 📍 Compare your old topside dimensions to 4-3/8″ × 1-5/8″ (mini-oval) 📍 Identify your spa’s button layout and pump/blower/light configuration to choose the matching overlay 📍 Contact Parts4Tubs with your spa pack model number if you’re unsure
⚠️ Important: The VL200 uses a different connector than Balboa’s BP-series and ML-series topsides. RJ45 (Ethernet-style) is for VS/GS systems; 4-pin Molex is for BP systems; 8-pin Molex is for EL/GL systems. Verify your existing connector before ordering — these are not interchangeable.
🔘 Button Functions & Display
The VL200 has 4 physical buttons. The labels and active functions depend on which overlay sticker is applied — common layouts include:
Standard 4-Button Layout (Balboa Overlay 1320 — Jet/Light/Cool/Warm):
| Button | Function |
|---|---|
| Jets | Jet pump on/off and 2-speed cycle |
| Light | Spa light on/off |
| Cool | Decrease set water temperature |
| Warm | Increase set water temperature |
Duplex Layout (Balboa Overlay 1318 — Jets/Jets/Temp/Light):
| Button | Function |
|---|---|
| Jets 1 | Pump 1 on/off and speed cycle |
| Jets 2 | Pump 2 (or blower) on/off |
| Temp | Temperature adjust |
| Light | Spa light on/off |
Duplex Heat Jacket Layout (Balboa Overlay 1268 — Jet/Light):
For spas with heat jacket systems where temperature is controlled at the spa pack — the topside primarily handles jets and lighting.
Display Information:
| Display Element | Shows |
|---|---|
| Temperature | Current and set water temperature (°F) |
| Function status | Pump, blower, heater, and light active states |
| Mode indicators | Standard / Economy / Sleep mode status |
| Filter cycle | Filtration status |
| Error codes | Diagnostic codes from the spa pack |
📌 On 4-button overlays without dedicated temperature buttons, temperature is typically adjusted by holding the Jets or Temp button and using a single-press cycle through the LCD prompts.
🛠️ Installation Guide
Before Installation:
- ⚠️ Disconnect power at the GFCI breaker before any work
- ⚠️ Confirm your spa pack is a Balboa VS or GS series model with an RJ45 topside port
- ⚠️ Verify the 6-foot cable will reach from the topside cutout to the spa pack — order an extension if needed
- ⚠️ Have your replacement overlay ready (or carefully transfer the existing one)
Installation Steps:
- Turn off power at the GFCI / disconnect serving the spa
- Open the spa cabinet and locate the topside RJ45 cable on the spa pack
- Disconnect the old cable from the spa pack’s RJ45 jack — press the small plastic tab and pull straight out
- Remove the old topside from the spa shell cutout
- Carefully transfer the existing overlay to the new panel (or apply your new overlay sticker)
- Route the new cable through the cabinet to the spa pack
- Plug the new RJ45 connector into the spa pack’s topside port — the tab should click into place
- Mount the new topside in the spa shell cutout — apply silicone sealant around the panel edge if recommended by your spa manufacturer
- Restore power at the breaker
- Test all functions — every active button on your overlay
Mounting:
| Requirement | Specification |
|---|---|
| Panel size | 4-3/8″ × 1-5/8″ (mini-oval) |
| Mounting type | Drop-in / surface-mounted with sealant |
| Adapter plate | Available — Lite Leader adapter plate (8-9/16″ × 3-1/2″) fits older or differently-shaped cutouts |
⚠️ Professional installation by a licensed electrician is recommended if you’re unfamiliar with spa electronics. All work must comply with the National Electrical Code (NEC) and local codes.
⚡ Wiring & Connection
Connector Information:
| Specification | Detail |
|---|---|
| Connector Type | RJ45 8-Wire (8-Pin Phone Plug / Ethernet Style) |
| Cable Length | 6 ft standard |
| Extension Available | Yes — Balboa RJ45 extension cables in various lengths |
Connection Location:
Plugs into the dedicated RJ45 topside port on Balboa VS or GS series spa packs.
The connector looks like a standard Ethernet / network cable plug.
A small plastic latch holds the plug in place — press to release.
⚠️ Never force the connector. The RJ45 plug should slide in cleanly with a click. If it doesn’t fit, your spa pack is likely a BP, EL, or GL series (which use Molex connectors instead) — verify before proceeding.
🔍 Troubleshooting
Common Issues:
| Problem | Possible Cause | Solution |
|---|---|---|
| Blank display | No power or loose connection | Verify breaker on; reseat the RJ45 plug at the spa pack |
| Error codes shown | Spa pack issue (sensor, flow, heater) | Refer to your VS/GS series manual for code meanings |
| Buttons unresponsive | Worn overlay or moisture intrusion | Inspect overlay for wear or water damage |
| Wrong button functions | Overlay doesn’t match spa configuration | Order a different overlay layout to match your pump/blower setup |
| Aux/Blower button doesn’t work | Spa pack not configured for duplex | Check spa pack DIP switch or configuration |
| Foggy or unreadable LCD | Internal moisture from a failed overlay seal | Replace the panel; ensure new overlay is properly applied |
| Incorrect temperature reading | M7 sensor fault on spa pack (not topside) | Check M7 temperature sensor at the heater |
| Garbled or partial display | Damaged cable or panel fault | Inspect cable for kinks; replacement may be needed |
Error Codes:
Error codes are generated by the spa pack, not the topside.
Refer to your specific VS or GS series spa pack manual for code definitions.
Common codes: HL (high limit), HH (heater high), Sn (sensor), FL (flow).
🔧 Maintenance & Care
Routine Care:
| Task | Frequency |
|---|---|
| Wipe panel face with damp cloth | Weekly |
| Check button response | Monthly |
| Inspect cable connections | Annually |
| Inspect overlay for wear and water seal | Annually |
DO NOT:
- ❌ Use abrasive cleaners or scouring pads
- ❌ Submerge the panel in water or chemicals
- ❌ Use solvent-based cleaners (acetone, lacquer thinner, etc.)
- ❌ Press buttons with sharp objects (pens, keys, fingernails)
Overlay Replacement:
If your overlay becomes worn, faded, peeling, or buttons are unresponsive due to overlay damage, replacement overlays are available separately. Common VL200 overlays:
| Overlay Layout | Balboa Part Number |
|---|---|
| Jet / Light / Cool / Warm (Icon 10/VL200 standard) | 1320 |
| Jets / Jets / Temp / Light (duplex pump) | 1318 |
| Heat Jacket System (Jet / Light) | 1268 |
| Duplex Mini Oval (Jet / Light, LCD) | 1249 |
| Duplex (Jet / Blower / Light, LCD) | 1255 |
🎯 Ideal Applications
| Application | Suitability |
|---|---|
| ♨️ Replacement for failed VL200 topside | ✅ Direct fit |
| ♨️ Spas with Balboa VS or GS series spa packs | ✅ Ideal |
| ♨️ Compact spa shells with limited deck space | ✅ Mini-oval footprint |
| ♨️ Duplex (pump + blower) hot tubs | ✅ Compatible (with duplex overlay) |
| ♨️ Heat jacket system spas | ✅ Use heat jacket overlay (1268) |
| ♨️ Viking Spas (pre-2015 models) | ✅ Direct factory equivalent |
| ♨️ QCA Spas (with VS/GS systems) | ✅ Direct factory equivalent |
| ♨️ OEM use by spa builders | ✅ Pair with custom overlay |
| ♨️ Repair shop service inventory | ✅ Use existing overlay from customer’s old panel |
| ♨️ Multi-pump premium spas | ❌ Use larger TP-series for more buttons |
Common Replacement Scenarios:
- LCD display has gone blank, foggy, or shows partial segments
- One or more buttons no longer respond
- Internal water damage from a failed overlay seal
- Cable damaged or pulled during cabinet service
- Owner has any of the 30+ older Balboa part numbers that have been consolidated into the VL200
- Builder/installer needs a base panel for a custom overlay design
- Replacement on Viking, QCA, or other OEM spas built around Balboa VS/GS systems
🤔 Frequently Asked Questions
Q: Is the overlay included? A: No — this listing is for the topside panel only, without the overlay sticker. You can either transfer the overlay from your existing panel or purchase a function-specific overlay separately. Common VL200 overlays include 1320 (Jet/Light/Cool/Warm), 1318 (Jets/Jets/Temp/Light), 1268 (Heat Jacket System), and others.
Q: How do I know which overlay I need? A: Match your existing button labels and your spa’s pump/blower configuration:
- Single 2-speed pump + light + temp → overlay 1320
- Two pumps (or pump + blower) + temp + light → overlay 1318
- Spa with heat jacket system → overlay 1268
- Single pump + light, duplex digital → overlay 1249
- Pump + blower + light, duplex digital → overlay 1255
If you’re unsure, send Parts4Tubs a photo of your existing topside.
Q: How is the VL200 different from the BP-series TP topsides (TP200W, TP240, TP500S, etc.)? A: Different control architectures entirely:
- VL200 uses an RJ45 8-wire (Ethernet-style) connector and works with Balboa VS/GS series spa packs
- TP-series topsides use a 4-pin Molex connector and work with Balboa BP series spa packs They’re not interchangeable — your spa pack must be designed for one or the other. Check the connector on your existing topside cable to identify which family you have.
Q: How do I know if this fits my spa? A: Check your spa pack model — it must start with “VS” or “GS” (e.g., VS501Z, GS501Z, VS513Z, GS513Z). Your existing topside cable must have an RJ45 (Ethernet-style) connector, not a Molex plug. Your spa shell cutout should match the 4-3/8″ × 1-5/8″ mini-oval. If those check out, this will fit.
Q: My old part is one of the older Balboa numbers (52144, 52487, 55472, etc.). Will the VL200 replace it? A: Yes — the VL200 is the modern consolidated replacement for an extensive list of older Balboa VL200-family part numbers, including 52144, 52312, 52487, 53238, 55123, 55472, 11095, 163742, X310001, and many more. If your existing panel is a 4-button mini-oval LCD topside with an RJ45 connector, the VL200 is almost certainly the right replacement.
Q: Can I install this on a Viking Spa or QCA Spa? A: Yes — the VL200 is the factory-original or factory-equivalent topside on Viking Spas (pre-2015 models) and QCA Spas that use Balboa VS/GS control systems, plus many other major hot tub brands.
Q: What’s the cable length? A: The cable is 6 feet long with an RJ45 8-wire connector. If you need more reach, Balboa offers RJ45 extension cables in various lengths.
Q: Will this work with my 120V or 240V spa? A: Yes — the topside itself runs on low-voltage signal from the spa pack, so it works regardless of whether your spa pack is wired for 120V or 240V service.
Q: My old part says G8220 — is this the same? A: Yes. G8220 is the manufacturer part number for the VL200 without overlay. This listing is the direct equivalent.
Q: The spec sheet says “M7 sensor technology” — what does that mean? A: M7 is Balboa’s patented temperature and flow sensor system used in VS/GS spa packs. The VL200 displays the readings from these sensors on its LCD. M7 sensors give more accurate temperature and flow readings than older single-sensor systems. This is a feature of your spa pack, not the topside — the VL200 simply integrates with it.
Q: What if my old cutout doesn’t match the small mini-oval? A: A Lite Leader adapter plate is available (8-9/16″ × 3-1/2″) that covers larger or differently-shaped cutouts left by older or larger topsides. Contact Parts4Tubs for adapter plate options.
Q: Can I install this myself? A: If you’re comfortable safely shutting off power at the GFCI breaker and working inside the spa cabinet, DIY installation is straightforward — RJ45 plugs are easy to handle and only fit one way. If you’re not, a licensed electrician is recommended for NEC and local code compliance.
Q: What warranty is included? A: This part carries a 1-year limited manufacturer warranty from Balboa Water Group. Contact Parts4Tubs for full warranty terms.
Q: Do you ship across the US? A: Yes — Parts4Tubs ships to all 50 states with fast US delivery.
📥 Downloads & Resources
 |
VL Series Spec Sheet Download |
🏆 Why Choose the Balboa VL200 Topside
- ✅ Genuine Balboa OEM — Not a copy or aftermarket lookalike
- ✅ One of the most widely used OEM topsides in the industry — Standard fit on Viking (pre-2015), QCA, and many others
- ✅ Mini-oval compact form — Fits small spa shell cutouts where larger panels won’t
- ✅ LCD readout with M7 sensor support — Modern, accurate temperature display
- ✅ Replaces 30+ older Balboa part numbers — One panel covers an enormous range of legacy topsides
- ✅ Choice of 5+ overlay layouts — Match any common single-pump or duplex spa configuration
- ✅ Hot-swappable — Drop-in replacement on any compatible VS/GS system
- ✅ Adapter plate available — Easy upgrade from differently-shaped older topsides
- ✅ RJ45 connector — Standard, easy-to-handle Ethernet-style plug
- ✅ Backed by Balboa warranty — 1-year limited warranty
🇺🇸 Why Buy From Parts4Tubs
- ✅ Fast US shipping to all 50 states
- ✅ Expert advice from spa specialists
- ✅ Compatibility assistance — send us your spa pack model number
- ✅ Full manufacturer warranty support
- ✅ Easy returns within 30 days
- ✅ Multiple overlay layouts, adapter plates, and RJ45 extension cables available
- ✅ Genuine OEM Balboa Water Group parts
⭐ Summary
The Balboa VL200 topside (without overlay) is the genuine OEM 4-button mini-oval LCD replacement panel for any Balboa VS or GS series spa. With its compact 4-3/8″ × 1-5/8″ footprint, RJ45 8-wire connector, 6-foot cable, M7 sensor compatibility, and support for 2-speed pump + 1-speed blower + light + temperature control, it’s one of the most widely used OEM topsides in the entire spa industry — covering more than 30 legacy Balboa part numbers in a single modern SKU. Pair it with the appropriate overlay for your spa’s configuration (1320 for single-pump, 1318 for duplex, 1268 for heat jacket, 1249/1255 for various LCD duplex layouts). Trusted as the factory topside on Viking (pre-2015), QCA, and other major hot tub brands. Order today from Parts4Tubs for fast US shipping and expert support.
What is a Hot Tub Topside Control?
A Hot Tub Topside Control, also known as a spa control panel or topside controller, is a user interface located on the outer surface of a hot tub or spa. This control panel allows you to interact with and manage various functions of your hot tub, such as adjusting the temperature, activating jets and pumps, setting filtration cycles, controlling lighting, and more. It serves as the command center that puts the power of customization at your fingertips, enabling you to create the perfect spa experience tailored to your preferences.
Typically equipped with a digital display, buttons, and possibly a touchscreen, a topside control panel provides an intuitive and user-friendly way to operate your hot tub. Some advanced models may even offer wireless connectivity, allowing you to control your hot tub remotely through a smartphone app.
As a proud supplier of top-quality spa parts and accessories at Parts4Tubs.com, I'm excited to guide you through the world of Hot Tub Topside Controls. These ingenious devices offer convenience, comfort, and control, ensuring your hot tub relaxation is precisely how you envision it. Let's explore the ins and outs of Hot Tub Topside Controls and how they elevate your spa experience to the next level.
How does a Topside Control Work?
A Hot Tub Topside Control, often equipped with a digital display and user-friendly buttons, is the primary interface that allows you to interact with and control various functions of your hot tub. Here's how it works:
- User Interface: The topside control panel is mounted on the exterior of the hot tub, usually within arm's reach when you're seated inside. It features a digital screen that displays relevant information such as water temperature, pump status, and timer settings.
- Menu Navigation: The control panel presents a menu system that you navigate using the buttons or touchscreen. This menu system provides access to different functions and settings of your hot tub.
- Temperature Adjustment: One of the key functions of the topside control is temperature regulation. You can adjust the water temperature to your desired level, ensuring a comfortable and relaxing soak.
- Pump and Jet Control: Through the control panel, you can activate and control the operation of various pumps and jets in your hot tub. This includes turning jets on or off, adjusting their intensity, and controlling the filtration system.
- Lighting and Auxiliary Features: Many hot tubs come with additional features such as underwater lighting, waterfalls, and music systems. The topside control allows you to manage these features, creating an ambiance that suits your mood.
- Timer and Programming: Modern topside controls often have programming capabilities, allowing you to set timers for filtration cycles, heating, and other functions. This automation ensures that your hot tub is ready for use when you want it.
- Error Messages and Diagnostics: In case of any issues or malfunctions, the topside control panel can display error codes or messages. This helps you identify problems and communicate them to technicians for faster and more accurate repairs.
- User Profiles: Some advanced topside controls offer the option to save user profiles. This is particularly useful if multiple people use the hot tub, as each person can have their preferred settings readily available.
In essence, the topside control serves as the bridge between you and your hot tub's various systems. It allows you to customize your hot tub experience, control its functions, and maintain optimal performance with ease. As you sit back and relax in your hot tub, the topside control ensures that everything is at your fingertips, providing a seamless and enjoyable spa experience. At Parts4Tubs.com, I'm dedicated to providing you with the finest hot tub parts and accessories, including high-quality topside controls, to enhance your hot tub enjoyment.
Can I upgrade a Topside Control?
Yes, you can upgrade a topside control on your hot tub to enjoy enhanced features and improved functionality. Upgrading your topside control can offer several benefits:
- Advanced Features: Newer topside controls often come with advanced features that may not be available on older models. These features could include improved user interfaces, touchscreens, customizable settings, and compatibility with smart home systems.
- Ease of Use: Upgraded topside controls may offer a more intuitive and user-friendly interface, making it easier to navigate through menus, adjust settings, and control various functions of your hot tub.
- Energy Efficiency: Some upgraded controls offer energy-saving modes or programmable timers, allowing you to optimize the operation of your hot tub's components and reduce energy consumption.
- Compatibility: If you've added new features or components to your hot tub since its original purchase, an upgraded topside control may be necessary to fully integrate and control these additions.
- Error Detection and Diagnostics: Modern topside controls often have improved diagnostic capabilities, which can help you identify and address issues more efficiently. This can save you time and money on repairs.
- Remote Access: Certain upgraded topside controls can be connected to mobile apps or home automation systems, allowing you to control your hot tub remotely. This can be especially convenient for preheating your hot tub before you arrive home.
- Customization: Upgraded controls may offer more customization options, allowing you to tailor your hot tub experience to your preferences, such as personalized user profiles.
Before upgrading your topside control, consider the compatibility with your hot tub model and the specific features you're looking for. Consult your hot tub manufacturer's guidelines or get in touch to ensure a smooth and successful upgrade. At Parts4Tubs.com, I offer a range of topside controls and hot tub parts to help you enhance your hot tub experience. I’m ready to assist you in finding the right topside control that suits your needs and preferences.
What is a Hot Tub Keypad Overlay?
A hot tub keypad overlay, also known as a spa control panel overlay, is a protective and decorative component used in hot tubs and spas. It typically consists of a thin, clear or colored piece of material, often made of durable plastic or silicone, that is designed to cover and protect the control panel or keypad of the hot tub.
Here's what a hot tub keypad overlay does:
-
Protection: The overlay acts as a protective barrier for the underlying control panel or keypad. It shields the sensitive electronics and buttons from exposure to water, chemicals, UV rays, and physical damage, such as scratches or abrasions. This helps extend the lifespan of the control panel.
-
Enhancement: Many overlays are designed with labels, graphics, and button outlines that enhance the appearance of the control panel. They often include icons or text that provide clear instructions for operating the hot tub, making it user-friendly, especially for those who may not be familiar with the hot tub's functions.
-
Customization: Hot tub keypad overlays can be customized to match the branding or style of the hot tub manufacturer. They may feature the manufacturer's logo, model name, or specific design elements. Some hot tub owners choose to customize overlays to add a personal touch to their spa.
-
Ease of Cleaning: The overlay is easier to clean and maintain than the underlying control panel. Spills, dirt, or chemical residues that come into contact with the overlay can be wiped away without affecting the control panel's functionality.
-
Replacement: Over time, keypad overlays may wear out or become damaged due to exposure to harsh spa conditions. Fortunately, they are relatively easy and cost-effective to replace when needed, allowing you to refresh the appearance of your hot tub's control panel.
When replacing a hot tub keypad overlay, it's essential to choose one that is compatible with your hot tub's make and model to ensure that the button layout and functions match the original control panel. This compatibility ensures that the overlay fits correctly and accurately represents the hot tub's settings.
In summary, a hot tub keypad overlay serves as a protective, decorative, and informative layer for the control panel, enhancing the user experience and prolonging the life of the hot tub's control system.
How do you replace a hot tub keypad overlay?
Replacing a hot tub keypad overlay is generally a straightforward process that can be done with some basic tools and careful attention. Here's a step-by-step guide on how to replace a hot tub keypad overlay:
Tools and Materials Needed:
- New keypad overlay (ensure it's compatible with your hot tub model)
- Screwdriver (usually a Phillips-head)
- Mild cleaner or rubbing alcohol
- Soft cloth or paper towels
Step-by-Step Instructions:
-
Turn Off Power: Start by turning off the power to your hot tub. This is essential for safety reasons.
-
Access the Control Panel: Depending on your hot tub's design, you may need to remove a cover or panel to access the control panel. Use a screwdriver to remove any screws or fasteners holding the cover in place.
-
Remove the Old Overlay: Carefully peel off the old keypad overlay. Begin at one corner and gently lift it away from the control panel. Take your time and be cautious not to damage the control panel or its components.
-
Clean the Control Panel: After removing the old overlay, use a soft cloth or paper towel and a mild cleaner or rubbing alcohol to clean the control panel's surface. This step ensures that the new overlay adheres properly and looks clean.
-
Prepare the New Overlay: Ensure that the new hot tub keypad overlay is clean and free of any dust or debris. If the new overlay has an adhesive backing, remove the protective film to expose the adhesive.
-
Align and Apply the New Overlay: Carefully align the new overlay with the control panel. Make sure it matches the button layout and design of the control panel. Begin by aligning one corner and gradually press the overlay onto the control panel's surface, working your way across. Smooth out the overlay to prevent air bubbles or wrinkles.
-
Secure the Control Panel Cover: If you had to remove a cover or panel to access the control panel, reattach it using the screws or fasteners you removed earlier.
-
Turn On Power: Once the new overlay is securely in place, and the control panel cover is reattached, turn the power back on at the main circuit breaker.
-
Test the Keypad: Test the keypad buttons to ensure they function correctly. Press each button to verify that it corresponds to the correct function on the hot tub.
-
Final Cleaning: After installation and testing, wipe down the new overlay with a clean, dry cloth to remove any fingerprints or residue.
You've now successfully replaced your hot tub's keypad overlay. Make sure to use a compatible overlay, and exercise caution during the replacement process to avoid damaging the control panel.
| Brand | Balboa Water Group |
|---|---|
| H Part# | 58-138-3313 |
Related products
ACC Overlays
$199.66
Watkins Topside Controls
$469.22
Out of stock
Hydro-Quip Spa Pack Controls
Hydro-Quip M1 Spa Control 1.0/4.0kW Low Flow Heater CS9234M1-F-U-LF
$987.06

Sundance Circuit Boards
Sundance® / Jacuzzi® 6600-297 J-300 LED Series Spa Circuit Board (2-Pump, CLEARRAY® On-Demand)
$590.80
Out of stock
Gecko Heating
$112.64
Gecko Spa Pack Controls
$343.01
Out of stock
Gecko Heating
$94.51
Spa Accessories
$686.40