


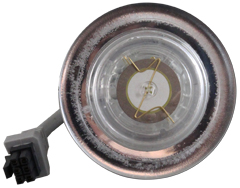

Balboa G8913 Spa Topside Control Panel – Auxiliary, BWG AX10A3
$70.01
13 in stock
Balboa AX10A3 Auxiliary Control Panel
SKU: 55533/G8913 | 1-Button Round Auxiliary Control Panel for Hot Tub Enthusiasts
Enhanced Control at Your Fingertips
The Balboa AX10A3 is a premium auxiliary 1-button control panel that puts convenient command of your hot tub’s Jets 3 function exactly where you need it! Designed for compatibility with popular Balboa systems, this round, compact control panel allows you to position additional controls at strategic locations around your spa for the ultimate in convenience and comfort.
Key Features
- 1-Button Configuration – Simple, dedicated control for Jets 3 function
- Compact Round Design – Sleek, space-saving shape that integrates perfectly with your spa’s aesthetics
- DIY-Friendly Installation – Simple mounting for easy placement at any seating position
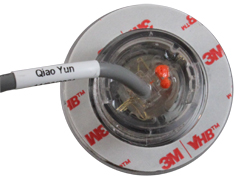
- 7-Foot Connection Cable – Flexible installation with 6-pin Molex connector
- System-Specific Programming – Engineered specifically for Jets 3 control functionality
- Weatherproof Construction – Durable design built to withstand hot tub environments
- 1-Year Warranty – Peace of mind with your purchase
Technical Specifications
| Specification | Details |
|---|---|
| Model | Balboa AX10A3 |
| Part Numbers | 55533, 52805, G8913 |
| Button Configuration | Single button (Jets 3) |
| Display Type | None |
| Panel Dimensions | 2¼” diameter (54mm) |
| Required Cutout | 1¼” diameter (31-35mm) |
| Cable Length | 7 feet (2.1m) |
| Connector Type | 6-pin Molex plug |
| Warranty | 1-year manufacturer warranty |
System Compatibility
The Balboa AX10A3 auxiliary control panel is specifically designed to work with:
- BP Series – Compatible with most BP series control systems
- GL Series – Works with GL2000, GL2001, GL8000 systems
- VS/GS Systems – Select VS and GS series systems with auxiliary support
Ideal for hot tubs with multiple pumps where additional control locations are desired for Jets 3 functionality. Always verify your specific system compatibility prior to purchase.
DIY Installation Guide
Installing your new Balboa AX10A3 auxiliary control panel is a straightforward DIY project that typically takes less than 30 minutes:
Tools Required:
- Hole saw (1¼” or 31-35mm)
- Phillips screwdriver
- Silicone sealant (optional)
Installation Steps:
- Power Down – Turn off power to your hot tub at the breaker for safety
- Select Location – Choose an optimal position for your auxiliary control, typically near a seat that’s far from the main control panel
- Mark and Drill – Use the hole saw to create a 1¼” (31-35mm) diameter opening in your spa shell
- Route Cable – Carefully feed the cable through the drilled hole to your control box area
- Connect – Plug the 6-pin Molex connector into the appropriate auxiliary port on your Balboa control system
- Mount Panel – Press the control panel firmly into the hole until secure
- Seal Edge – Apply a small bead of silicone around the edge if desired (optional)
- Power Up – Restore power to your hot tub and test functionality
For most compatible systems, no additional programming is required – the AX10A3 is pre-programmed specifically for Jets 3 functionality.
Why Add an Auxiliary Control?
An auxiliary control panel enhances your hot tub experience by:
- Increased Convenience – Control your Jets 3 function from any seat in your hot tub
- Improved Comfort – No need to move across the spa to adjust settings
- Enhanced User Experience – Perfect for larger spas with multiple seating areas
- Custom Functionality – Dedicated button for specific function control
- Simple Operation – One-touch activation of Jets 3 at your fingertips
Frequently Asked Questions
Q: Can I install this myself if I’ve never worked on a hot tub before? A: Absolutely! The AX10A3 is designed for easy DIY installation with its simple mounting and plug connection. Just follow our step-by-step guide.
Q: Will this work with my hot tub model? A: The AX10A3 is compatible with numerous Balboa systems, particularly BP and GL series. Verify your system has auxiliary support and a Jets 3 function before purchasing.
Q: Does this come with the overlay? A: Some AX10A3 models include the Jets 3 overlay while others don’t. Our model typically ships with the overlay included, but check the specific product listing to confirm.
Q: Can I use this for functions other than Jets 3? A: The AX10A3 is specifically programmed for Jets 3 functionality. For other functions, you would need the corresponding auxiliary panel (AX10A1 for Jets 1, AX10A2 for Jets 2, AX10A4 for Light, etc.).
Q: How many auxiliary panels can I add to my system? A: Most compatible Balboa systems support multiple auxiliary panels. The specific number depends on your control system model and available auxiliary ports.
Q: Can I extend the cable if needed? A: Yes, extension cables are available separately if you need additional length beyond the included 7-foot cable.
Q: What’s the difference between AX10A3 and other AX10 models? A: Each AX10 auxiliary panel is programmed for a specific function: AX10A1 (Jets 1), AX10A2 (Jets 2), AX10A3 (Jets 3/Blower), and AX10A4 (Light). They are not interchangeable despite similar appearances.
Who are Balboa Water Group?
Balboa Water Group is the world’s largest manufacturer of control systems and components for the spa and hot tub industry. With over four decades of experience, Balboa has established itself as the industry leader in innovation, reliability, and technological advancement.
The company’s commitment to quality is evident in their state-of-the-art manufacturing facilities and rigorous testing processes. Their control panels feature patented Piezo electronic switch technology and unique potting methods that prevent moisture damage in harsh hot tub environments.
Balboa’s comprehensive range extends beyond control systems to include pumps, heaters, jets, and accessories. All components are engineered for optimal performance, durability, and energy efficiency, enhancing the overall spa ownership experience.
Choosing Balboa products means selecting components that have been designed specifically for the demanding conditions of hot tub operation. Their reputation for reliability and innovation has made them the preferred choice for both hot tub manufacturers and DIY enthusiasts worldwide.

Parts4Tubs is proud to be a Balboa Authorized Online Seller - make sure you only buy genuine Balboa parts from trusted sources.
What is a Hot Tub Topside Control?
A Hot Tub Topside Control, also known as a spa control panel or topside controller, is a user interface located on the outer surface of a hot tub or spa. This control panel allows you to interact with and manage various functions of your hot tub, such as adjusting the temperature, activating jets and pumps, setting filtration cycles, controlling lighting, and more. It serves as the command center that puts the power of customization at your fingertips, enabling you to create the perfect spa experience tailored to your preferences.
Typically equipped with a digital display, buttons, and possibly a touchscreen, a topside control panel provides an intuitive and user-friendly way to operate your hot tub. Some advanced models may even offer wireless connectivity, allowing you to control your hot tub remotely through a smartphone app.
As a proud supplier of top-quality spa parts and accessories at Parts4Tubs.com, I'm excited to guide you through the world of Hot Tub Topside Controls. These ingenious devices offer convenience, comfort, and control, ensuring your hot tub relaxation is precisely how you envision it. Let's explore the ins and outs of Hot Tub Topside Controls and how they elevate your spa experience to the next level.
How does a Topside Control Work?
A Hot Tub Topside Control, often equipped with a digital display and user-friendly buttons, is the primary interface that allows you to interact with and control various functions of your hot tub. Here's how it works:
- User Interface: The topside control panel is mounted on the exterior of the hot tub, usually within arm's reach when you're seated inside. It features a digital screen that displays relevant information such as water temperature, pump status, and timer settings.
- Menu Navigation: The control panel presents a menu system that you navigate using the buttons or touchscreen. This menu system provides access to different functions and settings of your hot tub.
- Temperature Adjustment: One of the key functions of the topside control is temperature regulation. You can adjust the water temperature to your desired level, ensuring a comfortable and relaxing soak.
- Pump and Jet Control: Through the control panel, you can activate and control the operation of various pumps and jets in your hot tub. This includes turning jets on or off, adjusting their intensity, and controlling the filtration system.
- Lighting and Auxiliary Features: Many hot tubs come with additional features such as underwater lighting, waterfalls, and music systems. The topside control allows you to manage these features, creating an ambiance that suits your mood.
- Timer and Programming: Modern topside controls often have programming capabilities, allowing you to set timers for filtration cycles, heating, and other functions. This automation ensures that your hot tub is ready for use when you want it.
- Error Messages and Diagnostics: In case of any issues or malfunctions, the topside control panel can display error codes or messages. This helps you identify problems and communicate them to technicians for faster and more accurate repairs.
- User Profiles: Some advanced topside controls offer the option to save user profiles. This is particularly useful if multiple people use the hot tub, as each person can have their preferred settings readily available.
In essence, the topside control serves as the bridge between you and your hot tub's various systems. It allows you to customize your hot tub experience, control its functions, and maintain optimal performance with ease. As you sit back and relax in your hot tub, the topside control ensures that everything is at your fingertips, providing a seamless and enjoyable spa experience. At Parts4Tubs.com, I'm dedicated to providing you with the finest hot tub parts and accessories, including high-quality topside controls, to enhance your hot tub enjoyment.
Can I upgrade a Topside Control?
Yes, you can upgrade a topside control on your hot tub to enjoy enhanced features and improved functionality. Upgrading your topside control can offer several benefits:
- Advanced Features: Newer topside controls often come with advanced features that may not be available on older models. These features could include improved user interfaces, touchscreens, customizable settings, and compatibility with smart home systems.
- Ease of Use: Upgraded topside controls may offer a more intuitive and user-friendly interface, making it easier to navigate through menus, adjust settings, and control various functions of your hot tub.
- Energy Efficiency: Some upgraded controls offer energy-saving modes or programmable timers, allowing you to optimize the operation of your hot tub's components and reduce energy consumption.
- Compatibility: If you've added new features or components to your hot tub since its original purchase, an upgraded topside control may be necessary to fully integrate and control these additions.
- Error Detection and Diagnostics: Modern topside controls often have improved diagnostic capabilities, which can help you identify and address issues more efficiently. This can save you time and money on repairs.
- Remote Access: Certain upgraded topside controls can be connected to mobile apps or home automation systems, allowing you to control your hot tub remotely. This can be especially convenient for preheating your hot tub before you arrive home.
- Customization: Upgraded controls may offer more customization options, allowing you to tailor your hot tub experience to your preferences, such as personalized user profiles.
Before upgrading your topside control, consider the compatibility with your hot tub model and the specific features you're looking for. Consult your hot tub manufacturer's guidelines or get in touch to ensure a smooth and successful upgrade. At Parts4Tubs.com, I offer a range of topside controls and hot tub parts to help you enhance your hot tub experience. I’m ready to assist you in finding the right topside control that suits your needs and preferences.
What is a Hot Tub Keypad Overlay?
A hot tub keypad overlay, also known as a spa control panel overlay, is a protective and decorative component used in hot tubs and spas. It typically consists of a thin, clear or colored piece of material, often made of durable plastic or silicone, that is designed to cover and protect the control panel or keypad of the hot tub.
Here's what a hot tub keypad overlay does:
-
Protection: The overlay acts as a protective barrier for the underlying control panel or keypad. It shields the sensitive electronics and buttons from exposure to water, chemicals, UV rays, and physical damage, such as scratches or abrasions. This helps extend the lifespan of the control panel.
-
Enhancement: Many overlays are designed with labels, graphics, and button outlines that enhance the appearance of the control panel. They often include icons or text that provide clear instructions for operating the hot tub, making it user-friendly, especially for those who may not be familiar with the hot tub's functions.
-
Customization: Hot tub keypad overlays can be customized to match the branding or style of the hot tub manufacturer. They may feature the manufacturer's logo, model name, or specific design elements. Some hot tub owners choose to customize overlays to add a personal touch to their spa.
-
Ease of Cleaning: The overlay is easier to clean and maintain than the underlying control panel. Spills, dirt, or chemical residues that come into contact with the overlay can be wiped away without affecting the control panel's functionality.
-
Replacement: Over time, keypad overlays may wear out or become damaged due to exposure to harsh spa conditions. Fortunately, they are relatively easy and cost-effective to replace when needed, allowing you to refresh the appearance of your hot tub's control panel.
When replacing a hot tub keypad overlay, it's essential to choose one that is compatible with your hot tub's make and model to ensure that the button layout and functions match the original control panel. This compatibility ensures that the overlay fits correctly and accurately represents the hot tub's settings.
In summary, a hot tub keypad overlay serves as a protective, decorative, and informative layer for the control panel, enhancing the user experience and prolonging the life of the hot tub's control system.
How do you replace a hot tub keypad overlay?
Replacing a hot tub keypad overlay is generally a straightforward process that can be done with some basic tools and careful attention. Here's a step-by-step guide on how to replace a hot tub keypad overlay:
Tools and Materials Needed:
- New keypad overlay (ensure it's compatible with your hot tub model)
- Screwdriver (usually a Phillips-head)
- Mild cleaner or rubbing alcohol
- Soft cloth or paper towels
Step-by-Step Instructions:
-
Turn Off Power: Start by turning off the power to your hot tub. This is essential for safety reasons.
-
Access the Control Panel: Depending on your hot tub's design, you may need to remove a cover or panel to access the control panel. Use a screwdriver to remove any screws or fasteners holding the cover in place.
-
Remove the Old Overlay: Carefully peel off the old keypad overlay. Begin at one corner and gently lift it away from the control panel. Take your time and be cautious not to damage the control panel or its components.
-
Clean the Control Panel: After removing the old overlay, use a soft cloth or paper towel and a mild cleaner or rubbing alcohol to clean the control panel's surface. This step ensures that the new overlay adheres properly and looks clean.
-
Prepare the New Overlay: Ensure that the new hot tub keypad overlay is clean and free of any dust or debris. If the new overlay has an adhesive backing, remove the protective film to expose the adhesive.
-
Align and Apply the New Overlay: Carefully align the new overlay with the control panel. Make sure it matches the button layout and design of the control panel. Begin by aligning one corner and gradually press the overlay onto the control panel's surface, working your way across. Smooth out the overlay to prevent air bubbles or wrinkles.
-
Secure the Control Panel Cover: If you had to remove a cover or panel to access the control panel, reattach it using the screws or fasteners you removed earlier.
-
Turn On Power: Once the new overlay is securely in place, and the control panel cover is reattached, turn the power back on at the main circuit breaker.
-
Test the Keypad: Test the keypad buttons to ensure they function correctly. Press each button to verify that it corresponds to the correct function on the hot tub.
-
Final Cleaning: After installation and testing, wipe down the new overlay with a clean, dry cloth to remove any fingerprints or residue.
You've now successfully replaced your hot tub's keypad overlay. Make sure to use a compatible overlay, and exercise caution during the replacement process to avoid damaging the control panel.
| Hpart # | 58-138-3395 |
|---|---|
| Brand | Balboa Water Group |
Related products


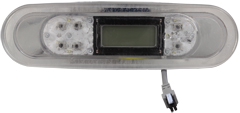
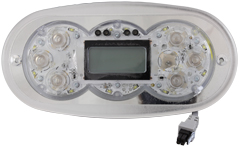
Balboa TP Topside Controls
$299.00


Balboa TP Topside Controls
Balboa TP200T Spa Topside Control Panel – BWG, No Overlay, G8421
$149.00

Balboa TP Topside Controls
Balboa TP540 Spa Topside Control Panel – J / Light / AUX, 6 Button, G8454
$189.00


Balboa TP Topside Controls
Balboa TP240W Spa Topside Control Panel – BWG, No Overlay, G8424
$149.00


Balboa TP Topside Controls
Balboa TP260W Spa Topside Control Panel – BWG, No Overlay, G8426
$149.00


Balboa TP Topside Controls
Balboa TP260T Spa Topside Control Panel – BWG, No Overlay, G8427
$149.00


Balboa TP Topside Controls
Balboa TP500S Spa Topside Control Panel – 6 Button, No Overlay, G8451
$189.00

Balboa TP Topside Controls
Balboa TP600 Spa Topside Control Panel – 6 Button, No Overlay, G8460
$189.00